
✅ Overlay CAD drawings on the Meissa platform to compare current construction status and design drawings at a glance. This allows you to quickly and efficiently identify discrepancies between the plans and the site.
▎Matching drawings (overlays)
① You can see the name of the drawing you uploaded, the upload type (auto raster, auto vector, manual placement), and the coordinate system.
② Enable the checkbox to see how your drawing will look aligned.
③ You can adjust the transparency with a horizontal bar or numerical entry.
▎Upload drawings (auto-placement)
This is the method you can use when you have a CAD drawing and know its exact coordinates. You can only upload files in DXF format, 100 MB or less.
① Click the
Add New button and select Upload File to display the 'Add Drawing File' pop-up. The New Folder feature allows you to create folders to manage your drawings.
② Select Automatic placement.
③ Click the + Add File button or drag and drop a drawing file.
④ Select the coordinate system set for the drawing. The default setting is the same as the project coordinate system; if the drawing coordinate system is different from the project coordinate system, select it manually.
⑤ Select a display method.
| Auto Vector | Reflect drawing data in real time. Compared to raster, the initial conversion is faster, but the computation is performed in real time as you view the drawing, including zooming in, zooming out, and panning the screen, which can be slow on less powerful devices. |
| Auto Raster (recommended) | Convert your drawing to an image to display it. Compared to vector methods, the initial conversion is slower, but subsequent operations are lightweight and fast. |
⑥ 모든 절차를 완료한 후, Upload 버튼을 눌러 도면을 등록합니다. Once you have completed all the steps, click the Upload button to register your drawing.
⚠️ For more information on how to do this, check out this article.
▎Upload drawings (manual placement)
This is the method to use when you don't know the exact coordinates of a drawing, or don't have a CAD drawing. You can upload files in PNG, JPG, PDF, and DXF formats, and 100 MB or less.
1. Register the drawing to be uploaded.
① Click the Add New button and select Upload File to display the 'Add Drawing File' pop-up.
② Select Manual placement.
③ Click the + Add Files button or drag and drop the files you want to upload.
④ Once you have completed all the steps, click the Upload button to register your drawing.
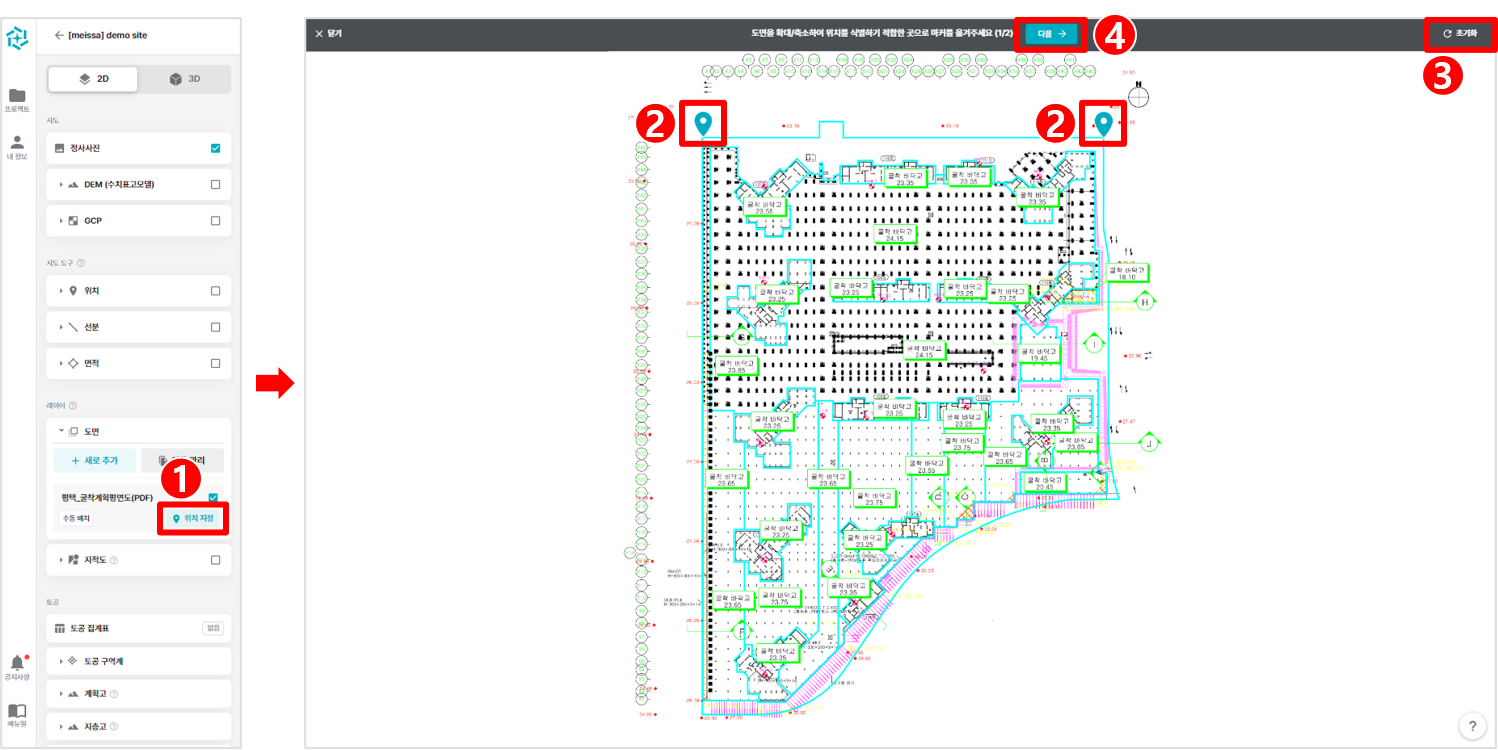 2. Specify a reference point for manual placement.
① Click the Position registered drawing button in the menu to go to the Specify manual placement reference points page.
② Select two random points and drag the markers to move them.
③ To return the marker to its original position, click the Reset button in the top-right corner.
④ When you're done placing markers where you want them, click the Next button.
3. Drag the markers to position the drawing to fit on the map.
① Drag the marker you specified on the previous page to adjust its position. The two markers' position adjusts the drawing's scale and angle.
② To revert to the original position during placement, click the Reset button in the top right corner.
③ When you are finished placing the drawing, click the Done button.
This is the output image of the process as a GIF.
▎Managing drawing data integration
① You can navigate to the Manage Drawing Integrations tab via the Manage Integrations button.
② You can see the name of each drawing and the upload type (auto raster, auto vector, manual placement).
③ Click the Select button to download or delete drawings selectively or in bulk.
④ Enabling a drawing with the slide button adds it to the drawing menu, while disabling it removes it from the drawing menu.
⑤ Drawings registered on the reference date are automatically unlinked on other dates.
⚠️ Cautions when matching drawings
- Comparing dates analyzed without specifying a ground reference point (GCP) may result in differences in field locations (batches).
Comments
0 comments
Please sign in to leave a comment.